SPIP now provides features to automatically apply effects to your images. These effects allow you to:
- ensure that the graphic design of your site is coherent by automatically creating navigation elements that will always follow the requirements laid out by the site’s graphic designer,
- create spectacular effects without requiring the article editors to carry out any complicated image manipulation and without jeopardising future graphical evolutions of the site.
For example, if you would like the navigation logos on the public site for the articles to have a mirrored look:
- as if they were standing on a shiny floor and "reflected horizontally",
- shown in (quite dark) black and white form when inactive but in colour when the user hovers the mouse cursor over them.
Without the automatic processing presented in this article, the webmasters would have to manually create multiple versions of each image to use on the site. This would have two major drawbacks:
- the image manipulation takes time, and can only rarely be performed by the editors themselves, and would need to be repeated for every new article/section,
- if at some point in the future the site’s design was to be changed, all the processing would have to be repeated.
With these new automatic mechanisms, a much simpler method of working is possible: the editors can just insert a simple logo on their articles (for example a photograph) without any special processing required. From these, the SPIP template system will be able to create (for example):
- a thumbnail of just the right dimensions,
- the same thumbnail in black and white,
- the reflection of the image “on the floor”.

Note: Some of the filters described here use image scaling functions. It is therefore mandatory that, after installing your site, you go into the private area, to the “Configuration” > “Advanced Functions” panel. From there you will need to select the “GD2” method for creating the thumbnails.
Performance Warning
Before you start reading further, you need to know that these features are quite heavy work for the server. The processing of one image can be long (in particular for very big images) and if your templates have multiple images to process, or even multiple effects for one image, the server could cause a time-out error (because the maximum execution time of the script would have been exceeded).
However, the image processing filters have their own cache system: once processed, a “filtered” image is saved and won’t need to be re-computed. The high server load will therefore happen only the first time the processing is requested.
This warning is particularly relevant on mutualised hosts.
The configuration panel “Empty the cache” in the private area will display the size of the image cache used by SPIP and give you the opportunity to clear it.
Transparency
If you use GD2, in addition to the features described in this article, you will notice that the image scaling filter (image_reduire) now respects the transparency of GIF and PNG 24 files (alpha layer transparency).
With this in mind, you should probably consider selecting GD2 as the image conversion method in the configuration page of your site.
The original image
Any image that is managed by SPIP can be processed by the following filters. All of the logos (for articles, sections, ...), but also the images from the portfolio (the images attached to your articles) and the new Typographical Images.
Here is an example image that we might want to process:

Scaling an image
The old filter reduire_image has been renamed image_reduire, to follow the naming convention of all the other graphical filters. Nonetheless, the old function name has been retained for backwards compatibility and will still work just the same.
Another filter has been introduced to complete the scaling functions: image_reduire_par allows to scale an image according to a factor (scale by). While reduire_image reduces the image to predetermined dimensions, the filter image_reduire_par will reduce it proportionally compared to its original size.
For example:
[(#TITRE|image_typo{taille=24}|image_reduire_par{2})]
reduces the typographical image by a factor of 2 (the image is half the size overall).
Reframing an image
The image_recadre{width,height,position} function is used to reframe an image (equivalent to the cropping technique in image processing programmes) with combination of left/center/right and top/center/bottom as regards the crop position (e.g. ’left center’).
For example :
[(#FICHIER|image_recadre90,90,center)]
crops the original image, extracting a 90 pixel by 90 pixel square from the centre of the original image
image_recadre also makes it possible to enlarge an image file, and the background is then specified by a either a colour or as ’transparent’ as the 4th argument:
[(#FICHIER|image_recadre{300,500,'top left','transparent'})]
Removing transparency and forcing the image format
The image_aplatir filter has two functions:
- it saves the image in a predefined format (for example, transforms a PNG into a GIF),
- it removes the transparency information and replaces the transparent parts with a specified colour.
For example:
[(#TITRE
     |image_typo{police=stencil.ttf,couleur=000000,taille=40}
     |image_aplatir{gif,ff0000})]
The typographical image created from the title text of an article is in PNG format with a transparent background. By applying the image_aplatir filter, we transform it into a GIF, and fill out all of the transparent zone with basic red (ff0000).
image_nb
The image_nb transforms an image to grey-scale (known as “black and white” in photography)

Without parameters (the left-hand image), the filter computes the grey levels as a weighting of each colour component in the original image, according to this equation:
luminosity = 0.299 × red + 0.587 × green + 0.114 × blue.
You can for ce different weightings for each RGB component by specifying a per-thousand value. For example (the right-hand image):
[(#FICHIER|image_nb{330,330,330})]
will assign each colour with an equal weighting.
image_sepia
The image_sepia filter applies a "Sepia" processing to the image. This type of effect applied to a photography will give the impression of the tonality of an old technology photograph.

Without parameters (the left-hand image), the sepia value is by default, "896f5e" (in RGB hexadecimal). You can provide this sepia tone colour as a parameter instead, for example (the right-hand image):
[(#FICHIER|image_sepia{ff0033})]
image_gamma
The image_gamma filter changes the luminosity of the image. It makes an image appear either brighter or darker. It takes a numerical parameter between -254 and 254. Positive values will brighten the image (254 making the image all white), while negative values will darken the image (-254 making the image all black).

[(#FICHIER|image_gamma{70})]
[(#FICHIER|image_gamma{150})]
[(#FICHIER|image_gamma{254})]
[(#FICHIER|image_gamma{-70})]
[(#FICHIER|image_gamma{-150})]
[(#FICHIER|image_gamma{-254})]
image_alpha
The image_alpha filter will change the transparency of the whole image and transform it into PNG 24 with an alpha layer. If the image already has transparency information, the values are merged.
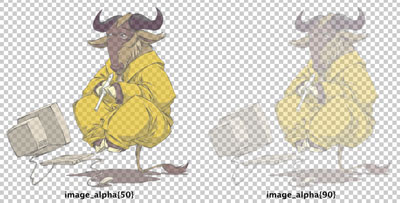
[(#FICHIER|image_alpha{50})]
[(#FICHIER|image_alpha{90})]
The parameter is a numerical value between 0 and 127: 0 doesn’t change the image while 127 makes it completely transparent.
image_flou
The image_flou filter applies a blur to the image. You can provide a numerical parameter between 1 and 11 specifying the level of blur (from 1 pixel wide blur to 11 pixel wide blur).
[(#FICHIER|image_flou)]
[(#FICHIER|image_flou{6})]
The default value being 3.

Warning: this filter is particularly greedy in resources (it will require a long processing time). If the server timeouts, you could try to replace a strong blur by multiple consecutive blurs. For example:
[(#FICHIER|image_flou{6})]
would become:
[(#FICHIER|image_flou|image_flou)]
This way, the processing can be done in two template “refreshes” as the result of the first blur will be saved in the cache.
Warning (2): this filter will change the dimensions of the image, adding a margin equal to the blur value around the image. Therefore, an image blurred by 3 (default) will have a margin of 3 pixels on each side, and the image will therefore be 6 pixels larger and taller than the original one.
image_rotation
The image_rotation filter rotates the image according to a set angle. A positive parameter will rotate the image clockwise.

[(#FICHIER|image_rotation{20})]
[(#FICHIER|image_rotation{-90})]
A rotation that is not a multiple of 90 will create a “stair” effect. A solution to reduce this effect is to scale down the image after the rotation.
Warning: this filter is relatively greedy in resources!
Warning (2): this filter will change the dimensions of the image.
image_flip_vertical and image_flip_horizontal
The image_flip_vertical applies a vertical mirror effect while the image_flip_horizontal one applies a horizontal mirror effect.
They do not accept any parameters.
[(#FICHIER|image_flip_vertical)]
[(#FICHIER|image_flip_horizontal)]

image_masque
image_masque is a very powerful filter. Therefore, its usage is more complex than the other filters. Starting from a PNG 24 file in grey-scale and with an alpha layer, it is able to modify:
- the image framing,
- the transparency of part of the image,
- the luminosity of part of the image.
- Image dimensions
If the original image is bigger than the mask file, then the original will be resized and cropped to the mask size, and the transparency and luminosity information provided by the mask will then be applied. This is very useful to create navigation thumbnails.
If the original image is smaller than the mask, then there is no reframing, and the information provided by the mask are directly applied (to its original dimensions).
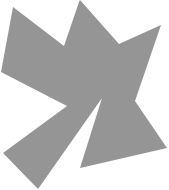
Suppose this is our original image:

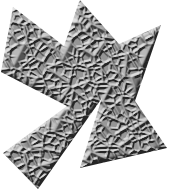
- Transparency mask
The transparency data provided by the mask are directly applied to the original image. A transparent pixel in the mask will make the corresponding pixel in the original image transparent, with the same transparency level (if the original image is already transparent, the data is merged).
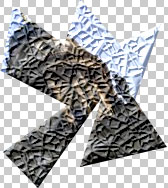
If we have the mask named "cutout1.png":
and applying the filter with:
[(#FICHIER|image_masque{cutout1.png})]
we will get the following image:

The original image is resized to the mask dimensions, and the transparent parts of the maps are now the transparent parts in the result.
Warning: this filter uses image reduction functions. Therefore, it will only work if the GD2 reduction method is chosen in the “Advanced functions” configuration panel.
- Luminosity mask
In the previous example, the colour of all the pixels of the mask is 50% grey. Therefore the original image colours are not modified (only a cutout is applied).
If the mask uses different intensities of grey, the resulting image will have a different luminosity from the original image. If a pixel of the mask is brighter, then the corresponding pixel in the resulting file will be brightened; if the mask pixel is darker, then the corresponding pixel is darkened in the resulting file.
For example, if we use the mask "cutout2.png":
applied with:
[(#FICHIER|image_masque{cutout2.png})]
we will get:
In both examples, the mask is smaller than the original image, therefore, a thumbnail-like image is created.
If the mask is bigger than the original image, then it is not resized. This can be useful to apply a texture to the image. For example to get the following effect:

we applied a larger mask with different grey levels.
Warning: The impact on the image’s luminosity will be more significant on the resulting image than in the mask.
Warning (2): In reality, the luminosity mask is a colouration mask. If the mask is in colour, then the luminosity and the colour of the resulting image will be modified. However, this effect is rather difficult to predict the results of.